Getting Started
GoRogue is a .NET Standard library, and as such, can be used with any .NET projects running on a platform that supports .NET Standard 2.0. Compatible platforms include, but are not limited to, .NET Framework 4.6.1 or higher, Mono 5.4 or higher, and .NET Core 2.0 or higher. Additional compatibility information for .NET Standard 2.0 can be found at Microsoft's site here.
The library is distributed as a NuGet package, so installation is exactly like that of any other NuGet package. Instructions below outline the process for popular platforms.
.NET Core
GoRogue may be used in a .NET Core project like any other .NET Core-compatible nuget package. Because GoRogue targets .NET Standard 2.0, .NET Core 2.0 or higher is required.
On Windows, setup is easiest using Visual Studio Community 2017, which can be downloaded for free here. With Visual Studio installed, perform the following steps:
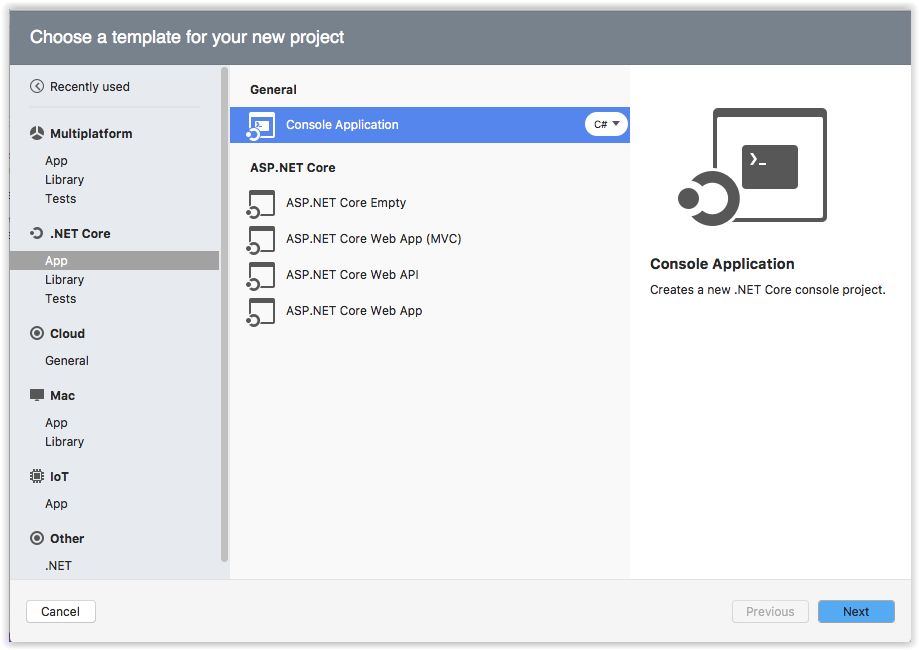
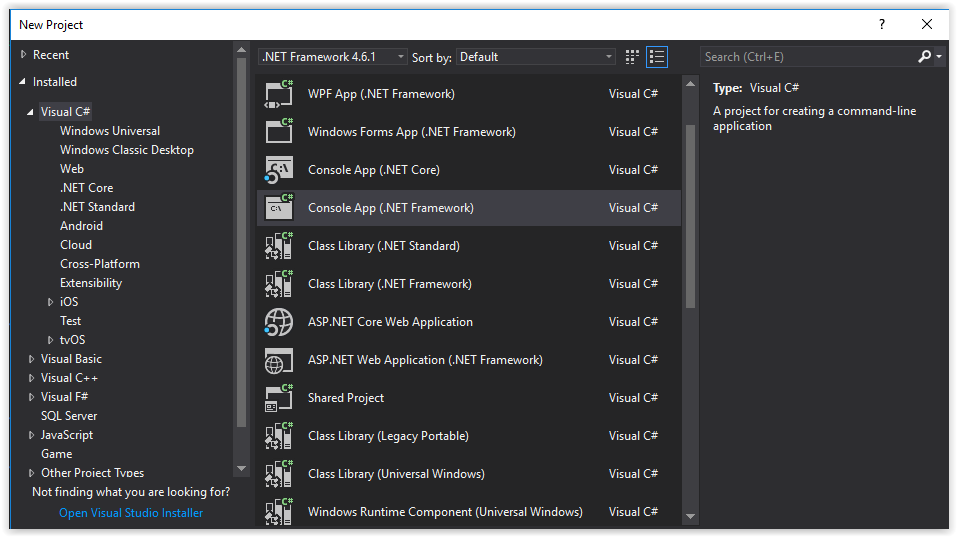
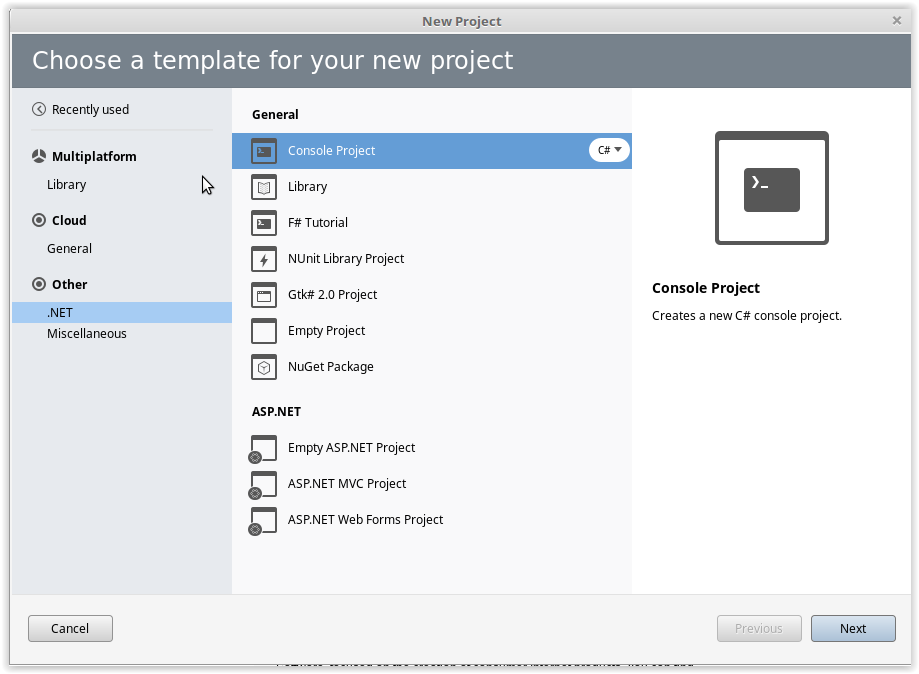
- Open Visual Studio, and select File->New->Project.... From templates, choose Visual C#->Console App (.NET Core). Note that any other .NET Core project type should also suffice.
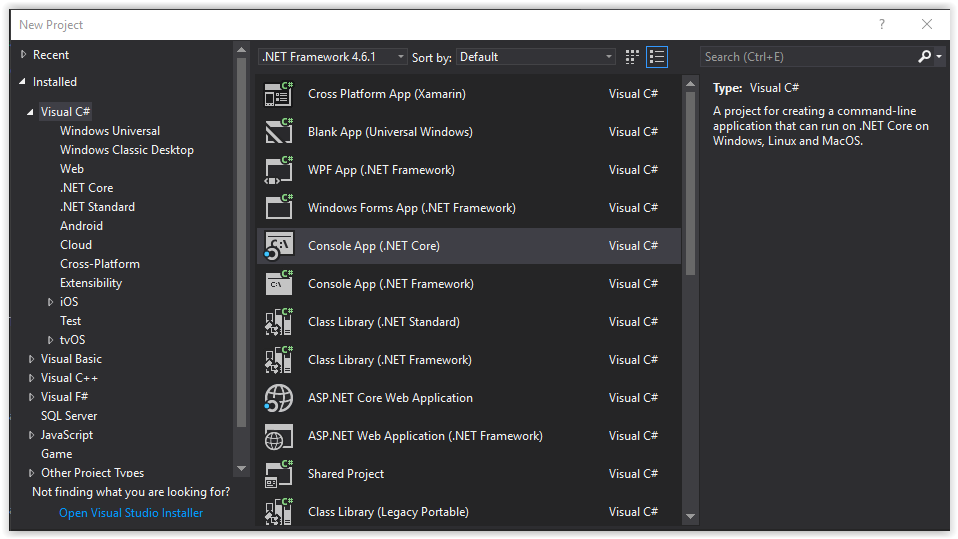
- Give the project any name and location you want. Although it is not required, you may want to ensure Create Directory For Solution is unchecked, as it will simplify the resulting file structure for single-project solutions (causing the project file to reside in the same location as the solution file, rather than a subdirectory). Click OK.
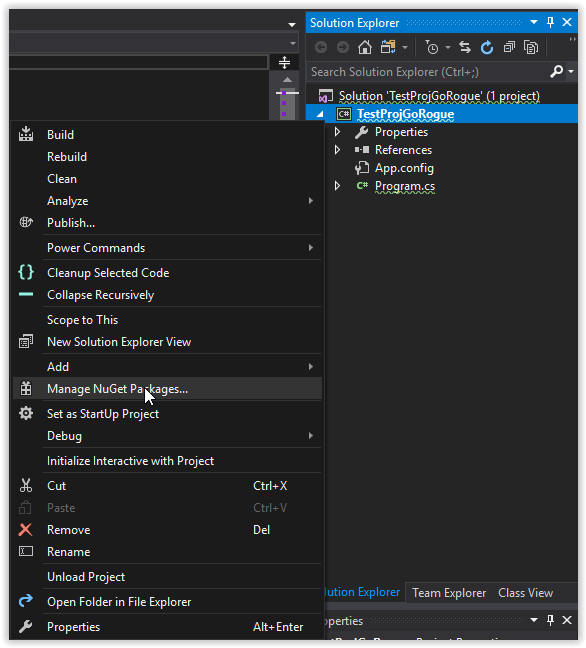
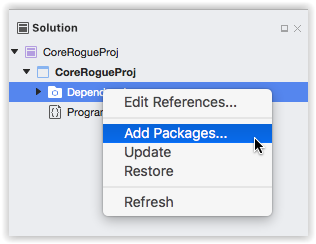
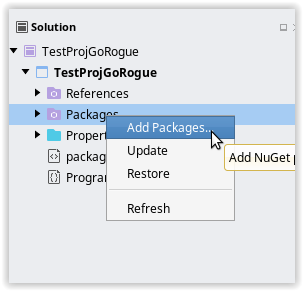
- Next, we must add the NuGet package. Right click on the project in the Solution explorer, and choose Manage NuGet Packages.
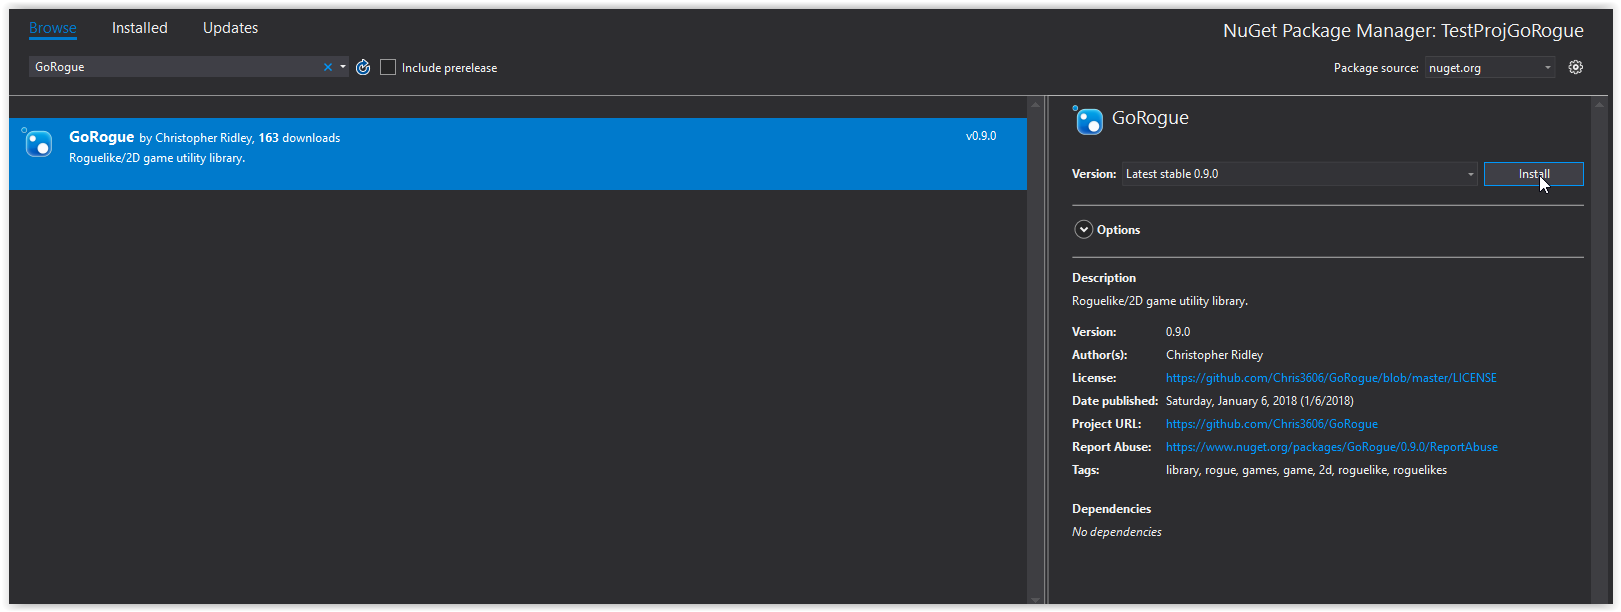
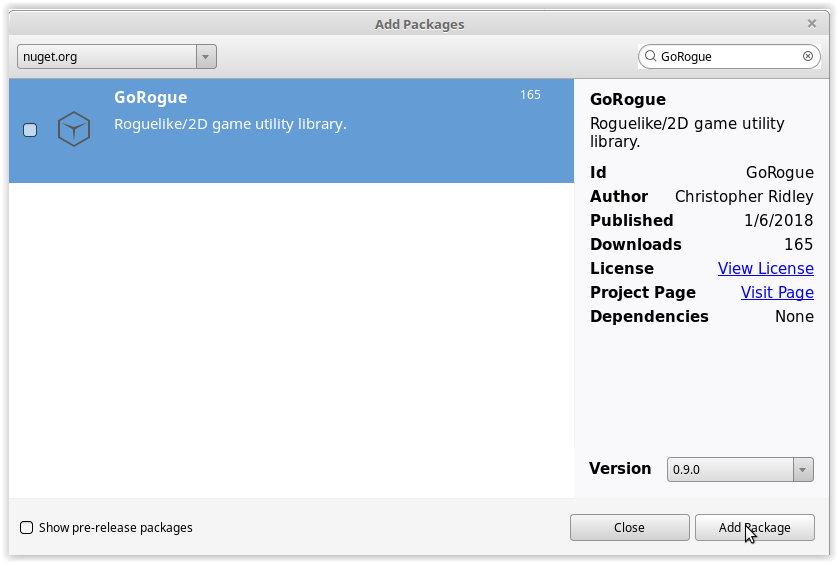
- Ensure that the Browse tab is selected, and that Package Source is set to nuget.org, then search GoRogue. Install the package.
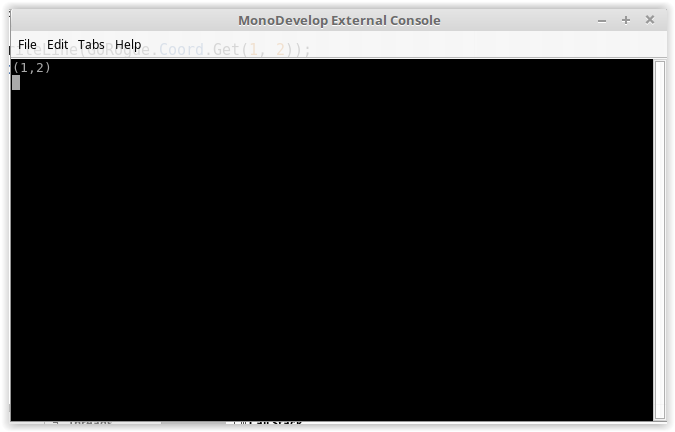
- Replace the Main function in Program.cs with the following:
static void Main(string[] args)
{
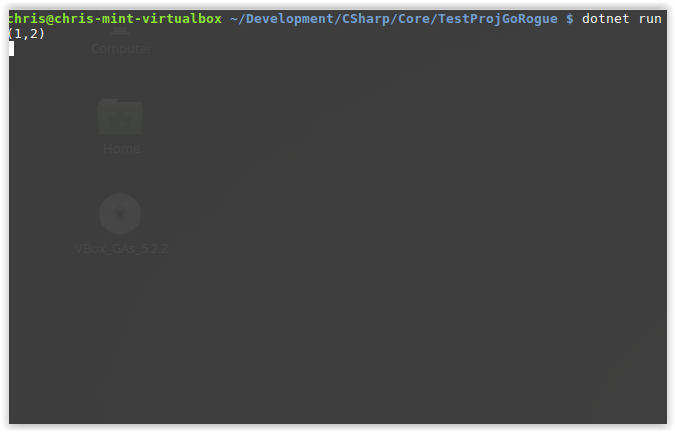
System.Console.WriteLine(new GoRogue.Coord(1, 2));
// Used to stop window from closing until a key is pressed.
int c = System.Console.Read();
}
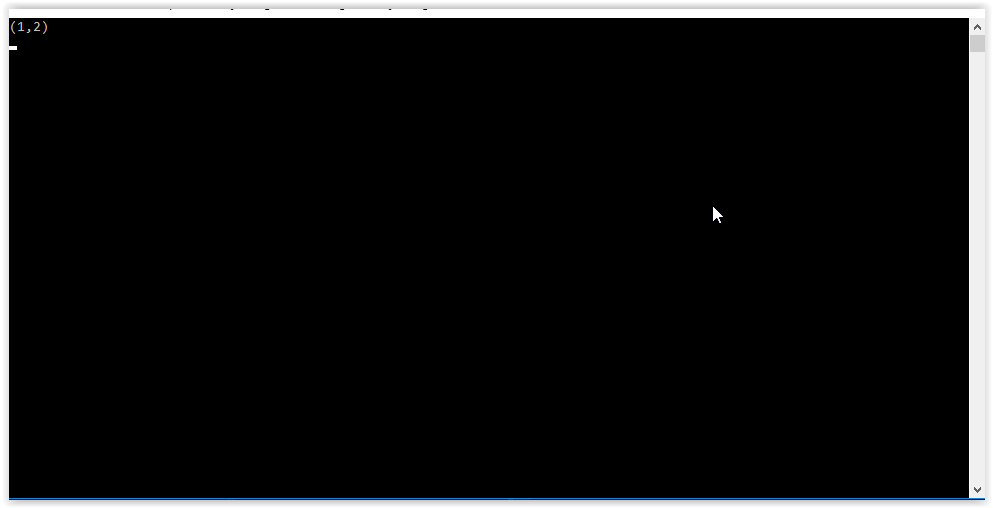
- Run the project and you should see the coordinate printed out.
.NET Framework
GoRogue may be used in a .NET Framework project like any other .NET Framework-compatible nuget package. Because GoRogue targets .NET Standard 2.0, .NET Framework v4.6.1 or higher is required.
On Windows, setup is easiest using Visual Studio Community 2017, which can be downloaded for free here. With Visual Studio installed, perform the following steps:
- Open Visual Studio, and select File->New->Project.... From templates, choose Visual C#->Console App (.NET Framework). Note that any other .NET Framework project type should also suffice.
- Give the project any name and location you want. Although it is not required, you may want to ensure Create Directory For Solution is unchecked, as it will simplify the resulting file structure for single-project solutions (causing the project file to reside in the same location as the solution file, rather than a subdirectory). Click OK.
- Next, we must add the NuGet package. Right click on the project in the Solution explorer, and choose Manage NuGet Packages.
- Ensure that the Browse tab is selected, and that Package Source is set to nuget.org, then search GoRogue. Install the package.
- Replace the Main function in Program.cs with the following:
static void Main(string[] args)
{
    System.Console.WriteLine(new GoRogue.Coord(1, 2));
    // Used to stop window from closing until a key is pressed.
    int c = System.Console.Read();
}
- Run the project and you should see the coordinate printed out.
Unity
GoRogue is fully capable of functioning with the Unity game engine. However, since Unity does not natively support the NuGet package management system, installation will need to be done manually using the GoRogue dlls. GoRogue provides dll builds on its GitHub releases page for each version to make this easy:
- Navigate to the GitHub releases page, and download the most recent versions
GoRogue_x.y.z_MinimalDependencies.zip.
Warning
Ensure you download the zip file labeled MinimalDependencies or it will not work correctly! The "minimal depedencies" builds are missing no functionality that is relevant in the Unity environment -- see Common Issues for details as to what these builds are and how they differ from the regular build.
- Extract the zip file, then drag and drop all files contained within it into your Unity project.
Godot
Because it supports .NET Standard 2.0 for its C# scripting, GoRogue also fully functions within the Godot game engine:
Make sure you have a version of Godot that supports C#.
Add the GoRogue NuGet package. Methods of doing this will vary with your development. See the Godot docs on using nuget packages for details.
Enabling SourceLink (Optional)
Starting with GoRogue 2.0, the library supports SourceLink, and distributes debugging symbols packages with each release in the form of .snuget packages. Enabling this functionality is optional, but if configured will allow you to step into GoRogue code using the debugger, just as you would your own code. This may be extremely helpful for identifying and tracking down issues with your code. The use of this feature requires Visual Studio 2017 version 15.9 or greater.
Add the NuGet debugging symbols source to your Visual Studio debugging settings by following the instructions in the "Consume snupkg from NuGet.org in Visual Studio" section of this webpage.
In Visual Studio, go to Tools->Options->Debugging, and ensure that "Just My Code" is disabled, and that "SourceLink Support" is enabled.
Utilizing Debug Builds
The support of SourceLink and symbols packages in GoRogue can make debugging code much easier. However, since the default GoRogue package for each version is still a "Release" build, it can still be challenging to debug code involving GoRogue function calls, as optimizations that occur during the release build process can limit the usefulness of debugging symbols. Thus, with each version of GoRogue, a "Debug" build is also provided. The debug build is categorized as a prerelease by nuget, so you will need to enable prereleases to see it. Once you do so, if you look at versions of GoRogue available, you will see two listings for each version -- x.y.z, which is the release build and x.y.z-debug, which is categorized as a prerelease, and is the debug build. If you need to perform debugging involving stepping into GoRogue code, simply switch your package version to the "-debug" version corresponding to the GoRogue version you are using. Then, you can switch back to the regular version when debugging is complete.
Common Issues
Below are some common issues that have occured during installation, and how to fix them.
Dependency Issues
GoRogue is designed to be highly portable, and can function in any environment that supports .NET Standard 2.0. While it does not depend on any libraries except Troschuetz.Random and OptimizedPriorityQueue (which NuGet will automatically install), it does provide some type conversions that makes the library more interoperable with other libraries, notably MonoGame. The project is set up in such a way as to avoid creating a hard dependency on MonoGame in the process, so the compiler should not attempt to resolve MonoGame as a required dependency of GoRogue. However, the method of doing this involves the use of a newer project file tag, which some older or non-standard compilers (notably, the Unity compiler), may be unable to handle properly. As such, when a project using GoRogue is compiled using these compilers, you may get an error saying that it cannot resolve the MonoGame dependency.
To counteract this, on the GitHub releases page, GoRogue provides .zip files that contain the GoRogue DLL and its dependencies. Specifically, it provides two zip files for each release -- GoRogue_x.y.z.zip and GoRogue_x.y.z_MinimalDependencies.zip. The "minimal dependency" builds are exactly like the regular builds, except they do not contain the type conversions for third-party libraries such as MonoGame. As such, these builds should be used in those cases where dependency errors related to MonoGame and other graphics libraries are encountered.